This evening I’ve been playtesting my new solitaire
convoy escort game. If you think of “B17 – Queen of the Skies” but driving a
Royal Navy warship rather than a 4-engined bomber you are on the right lines.
So, its 1942 and we are commanding HMS Crocus, a Flower
class corvette. Our crew is well trained but it’s the first time out for many
of them (we have no “special” crewmen who would give us bonuses in certain
situations). We have a full load of depth charges, a 4” gun, a radar that seems to be working well and
pantry stacked with hot chocolate!
Setup:
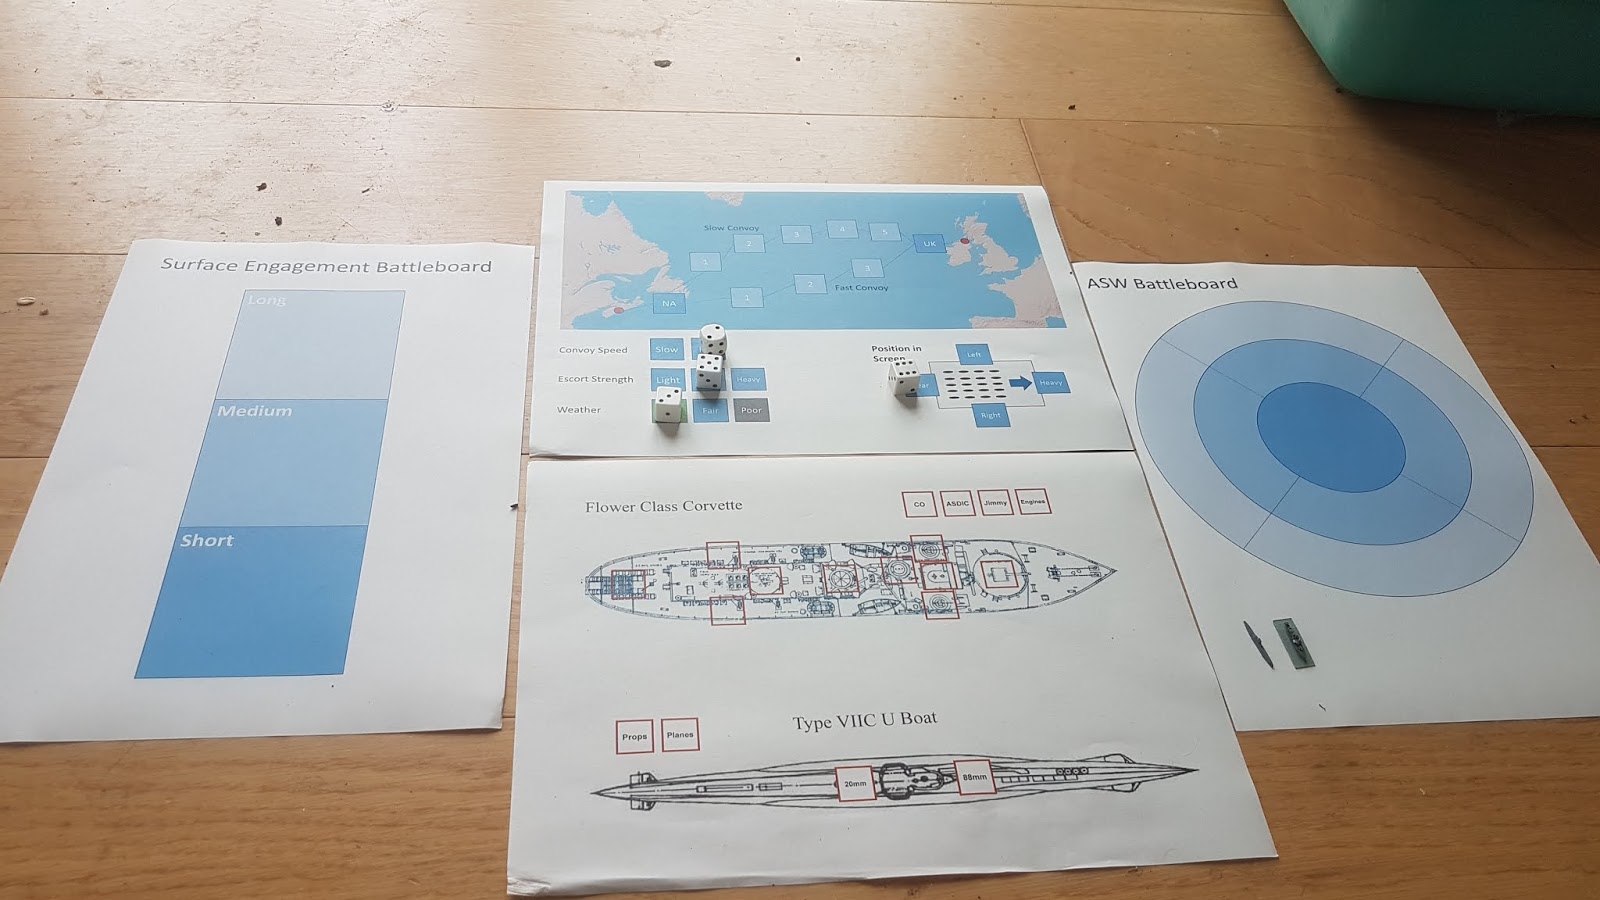
I’m using the random generation system to determine the
exact scenario, and it turns out that it is Spring 1942. We are escorting a
Fast convoy from Halifax, Nova Scotia to Liverpool. The escort strength is
normal, the weather is generally good. Our station is at the rear of the
convoy.
As we are running a Fast convoy we have 5 game turns to
play. The first is the North American coastal turn (“zone A”), we have 3 open
ocean turns (Zone B), and one turn in the Western Approaches as we close with
our destination (Zone C).
Each turn we roll for a random event, then for any
encounters.
Turn 1 – North American coast
Random event – we roll a 2, which means there is a
Support Group close by. This increases our effective escort strength to “Heavy”
for this turn.
Encounter - The die roll is a 4, which means no
encounter. Alas the presence of the SG is for naught.
The convoy plows on into the North Atlantic
Turn 2 – Open Ocean Square 1
Random event - we
roll a “no event”. An uneventful trip so far. But maybe too quiet.
Encounter – the die roll is a 3. Doenitz’s boats must be
hunting elsewhere
Turn 3 – Open Ocean Square 2
Random event – A 10 is rolled, +2 for Zone B = 12.
Maximum German effort. We’ve run into an accumulation of wolf packs, and will
have to roll twice for encounters.
Encounter 1 – Contact, and we have a possible submerged U
boat contact astern of the convoy. Our ship is dispatched to confirm and
engage.
Phase 1 - Contact level is “probable”, but then our radar picks up a
periscope – contact raised to “Positive”. The bridge crews’ eyes are peeled for
any incoming torpedo, but nothing is seen.
Phase 2 – we are now closing on the U boat. Contact is
maintained, no change. Which means he’s probably not going deep. We may have
caught him napping.
Phase 3 –As we don’t think he’s going deep we set depth
charges for Shallow and we run over the contact. DCs away! The sea erupts as
the spread detonates. We commence a turn to re-engage – and see a damaged u
boat broach the surface! (natural roll of 10)! Gun crews close up and we go to
a surface action.
Surface action:
We move to the Surface Engagement Battleboard, with the U Boat at Medium range. We make 3 critical hit rolls to determine the damage that the U boat has suffered in the DC attack.
Rolls are 2, 8 and 10. 2 is “no
effect”, 8 is “20mm damaged” but the 10 is “hull holed, boat sinks”. The U boat
just makes it to the surface in time to allow some of the control room team to
escape to the water, but before more than a handful get out the boat sinks,
taking the rest of the crew with her. We decide to pick up survivors; 5 German
sailors are pulled from the sea. The skipper is not one of them.
Having claimed our first kill we resume our position in
the screen.
Encounter 2 - No encounter (d10 roll is 2) – a tense night
as we skirt through the wolf pack, but the screen is working too well to let
the U boat commanders get a shot in. The turn ends
Turn 4 – Open Ocean Square 3
Random Event: Die roll is 3, +2 for Zone B = 5: engine
trouble. We drop out of the screen and slow whilst the chief engineer makes
repairs. On completion we speed up to try to regain our place at the back of
the convoy.
Encounter: Die
roll = 9, so there is an encounter. The encounter type die roll is a 6, so its
another ASDIC contact.
Phase 1 - The contact is ahead and seems to be heading in
the direction of the convoy, “step aside” won’t really work in this position so
we move to close the distance rapidly. Contact quality isn’t great, only a
“possible”. Radar isn’t spotting anything.
TORPEDO! – the lookouts spot the wake of a torpedo
closing rapidly from ahead. We are already on the right heading to comb the
tracks, a slight alteration and the torpedo passes down the port side. That was
close. There’s definitely a U Boat there, but the ASDIC contact still isn’t
great.
Phase 2 – contact is still “possible”. Since we know
there’s a boat somewhere that means ASDIC is having a hard time getting an
accurate bearing. Whether he’s going deep is anyone’s guess
Phase 3 – Set DCs for Deep (I have a feeling he’s there
but went deep when he launched his torpedo). The DCs detonate, but there’s no
sign of any wreckage. We turn to re-engage.
Reattack, Phase 2 – as the reverberations from our DC
attack subside the Jimmy reports “contact lost Sir”. We execute and repeat the
lost contact procedure several times but come up with nothing. And as we are
currently detached behind the convoy there’s no additional ships there to help
us. He’s probably got away.
Somewhat dejectedly we leave the scene and rejoin the
convoy a few hours later. At least the enemy was submerged and not able to
catch up. I wonder why he was dived though? Probably spotted us before we made
ASDIC contact. But I guess we’ll never know. (we draw a playing card and keep
it hidden until the game end; this will tell us what happened, after the war
when the archives are opened)
At this point, play was interrupted for a few minutes.....
Turn 5 – Western Approaches.
We are almost home, but in many ways this can be the most
dangerous part of the trip. But not this time.
Random event is 5, +4 for Zone C for a 9. Some of our
escort detaches to assist another convoy. Not really what we want. But the
encounter roll is a 5 “no encounter”, and so after a fairly eventful trip and
one U boat and some of her very lucky crew “in the bag” we make it in to
Liverpool for a quick turnaround before joining another escort force for a load
of empties in ballast. No rest for the wicked!
But what happened to the U boat that we attacked in Turn
4? We turn over the card we drew in the encounter and it’s the 9 of Hearts. Its
an odd number so he did go deep (we guessed right) and for a “no visible
result” damage effect (the most “severe” that we caused) this equates to minor
damage. The boat remained submerged, was not able to reach our convoy and
itself returned home safely.
And so ends the log entries for HMS Crocus for this
particular trip. Playing time (once I had removed the feline interloper who
stopped play for a few minutes) was just over an hour. I picked up several
areas where tweaks were needed, and a few additional elements that I worked up
– rescuing survivors being the rime example.
It was a fun game and I think resulted I a pleasing narrative that had
something of the feel of the Cruel Sea about it.
Right, I’m off to find come dark choccie and condensed
milk – time for a large hot mug of kai!